Padron my stir fry

I’m truly cooking for one for a couple of weeks while Carol is visiting her parents in Ohio. Last night, part of my dinner was two big ears of corn, grilled. I ate a little less than one, and cut the balance off the ears. When I started thinking about lunch today, I started thinking about corn.

July 27.09

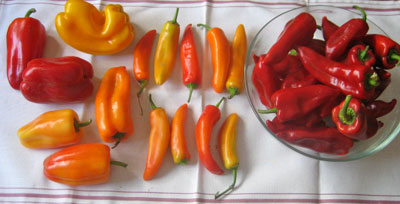
Who doesn’t love corn stir fried with onions, tomato and peppers? Well, I do. But I had no peppers. Oh… I have a bag of Pimiento de Padron peppers from my Mariquita Mystery Box. I was lucky to receive The Ladybug Letter about Pimiento de Padron, just as I was writing this.

“Padron is a town in Spain north of Portugal in Galicia on the Atlantic coast. The citizens of Padron would have been among the first Europeans to see and experiment with these new “peppers” that the explorers brought back from overseas. They adopted one particular variety out of all these newly arrived peppers to be their own “Pimiento de Padron.”

“Gallegan cooks learned that the tiny, tender peppers are very flavorful, and rarely have much heat at all to them if they’re picked young enough. Only the older, firmer, heavier, waxier peppers are hot, and they learned to pick them out and set them aside. The cooks learned too that these new peppers could be cooked fast, in just a little more time than it takes to heat up a cast iron skillet. They’d get the pan hot, splash a little olive oil onto it, and when the oil was almost smoking hot, they’d toss on a handful of the tiny peppers. The peppers would hop and sizzle for a few seconds. When the peppers were blistered on one side, the cooks would shake the pan, toss the peppers, and let them blister on the other side. Then a quick sprinkle of sea salt, a deft sweep of the pan with a wooden fork, and the peppers were served, ready to eat, sweet, savory, salty, and piping hot.” [excerpted from The Ladybug Letter, linked above]

That’s how I have enjoyed my Pimiento de Padron. But today I had something different in mind. Use the little, bright green morsels like one would a bell pepper. How bad can it be? Better yet, How good can it be? With Carol gone, I’m totally free to experiment and develop new ways with known ingredients. Continue reading

Lemon Chicken with Agretti

April 25.09

This dish is just so beautiful that I had to write about it. It comes from the stephencooks website, one of the quality food blogs out there. He has been a major source of inspiration for me since I became a lapsed architect.

Recently, Stephen was diagnosed with Type 2 Diabetes, so he took some time to get his life together and began anew with recipes to fit his new diet regimen. This is one of the first.

“Skinless boneless chicken breasts — or thighs, if well-trimmed of fat — always work very well for a healthy diet, whether you’re looking to control your blood glucose level or just trying to stay trim. They’re low fat, have zero carbs and are a good source of protein and so they frequently show up in diet regimens or recommendations.

The challenge with boneless breasts is, lets face it: how to make them interesting. The Chinese have a technique, however, called veleting which, with a little planning and a few simple ingredients, turns bland, dry chicken breast meat into a tender, juicy treat with a nice slippery feel in the mouth. I’ve learned this technique from years of cooking from Irene Kuo’s excellent The Key to Chinese Cooking.”

Low fat is not why I cook, but this looked intriguing, so I tried it. I used thighs – at least they have a modicum of flavor, and paired it with agretti, a green vegetable with a bright, lemony taste and succulent texture. Continue reading

Greens Attached

Many vegetables at the Farmers Market — even many supermarkets — come with greens attached. We haven’t discovered a good use for carrot tops; throw those in the compost, or better yet, have your vegetable guy top them for you, then you don’t have to carry them home. But turnip and beet greens are often beautiful, oh so edible and easy to prepare. The thing is, they don’t keep very long; so what to do?

Here’s what I do.

First, the turnips and turnip greens

04_turnips-greens06_turnip-greens-cook08_turnips-greens-lunch

Cut and wash the greens, cut up a couple of turnips. These are the little Tokyo turnips, you don’t even have to peel them.

Heat some olive oil over medium heat in a saute pan, add the turnips and greens… add a splash of water and cover. After a couple of minutes, give the greens a stir and season with salt and pepper. Cover and continue cooking for about 5 minutes total.

Uncover, splash with your choice of vinegar. Serve. That’s lunch — or at least the first course.

Now, for the beet greens. This will sound a lot like the turnips.

11_beets-greens113_beet-greens14_beet-greens-chop15_beet-greens-cook

Thoroughly wash the greens. Put; them in a big bowl of water, swoosh them around, take the greens out one by one, leaving any dirt behind. Put them in a strainer and rinse again with cold water.

Dice the stems and roughly chop the greens.

Heat some olive oil over medium heat in a saute pan, add the stems and cook for about a minute. Add the greens.. add a splash of water and cover. After a couple of minutes, give the greens a stir and season with salt and pepper. Cover and continue cooking for about 5 minutes total.

Uncover, splash with your choice of vinegar and taste to see if they’re tender.

Now, you can eat them if you’re hungry, or put them in a jar to store in the refrigerator until you need a side dish.

16_beet-greens-later

Sunday Breakfast

Carol and I religiously eat dinner together at the dining room table. As for other meals, it’s catch as catch can – we each prepare what we want when we want it and eat at the kitchen table. She’s a sandwich person, I’m not; I tend toward soup or anything made in a skillet.

Sunday morning, I had a hankering for eggs poached in some kind of tomato sauce. That’s a good start. Although I have various homemade tomato sauces in the freezer, none were ready to go.

I did have a can of Progresso Vegetable Classics Tomato Basil Soup in the drawer. That’s pretty good for use as tomato sauce, thick and tomatoey.

I got out some celery to chop into the soup, but with the refrigerator door open, spied some excess fava beans that I had shelled and blanched for a lamb stew. Even better.

I got out the eggs and put two in a bowl of hot tap water. That will warm them up a bit… it doesn’t seem right to put cold eggs into hot sauce.

favas in one bowl, shells in another

favas in one bowl, shells in another

Put a small skillet on the stove over medium high heat, and when it was pretty hot, covered the bottom with olive oil, added the favas and cooked a bit, tossed and cooked a bit more. Continue reading

Tomato Sausage Bake

Last August, I wrote a piece called Cooking from the TV which compared the TV version of a recipe to the book version – and the perils thereof. The subject was Tomato and Sausage Bake from the Food Network show, JAMIE AT HOME by Jamie Oliver.

This week I had some heirloom tomatoes from Bruins Farms market stand (greenhouse tomatoes to be sure), some thick bacon, and a fine coil of sausage from The Fatted Calf. What a perfect circumstance to revisit that recipe.

Starting ingredients

tomato-sausage-bake

Clockwise from the tomatoes:
Tomatoes – three kinds of heirlooms… you can see some rosemary in the pan already.
Focaccia — goes onto the serving plate to capture the juices
New potatoes – not part of the original recipe, but what the hell, they can roast right along with the rest.
Unpeeled cloves of garlic just below the potatoes.
Bacon – this has already been rendered in the roasting pan for about five minutes.
Thyme
Basque sausage from The Fatted Calf

Assembled in the roasting pan

tomato-sausage-bake-1

First, I put the roasting pan in a 375 oven for five minutes or so to render the bacon. Drain the bacon on paper towels. Put the tomatoes in until the skins blistered and I could pull off most of the skins with tongs.
Out of the oven, I slid the bacon under the tomatoes and added the potatoes and sausages. Back in the Countertop Convection Oven on fan bake for 30 minutes.

tomato-sausage-bake-2

Out of the oven and ready to serve over the focaccia. Drizzle with your good olive oil and you are set for a flavorful and comfortable dinner. Yum.

Fennel and Berkswell Cake

I saw some really nice, fennel at the farmers market recently and it reminded me of a fennel cake I’d had in London, so I went to Cheese Plus and asked if they had “Beekswell” cheese (that’s what was in my notes). Ray, the owner, said they had Berkswell, a raw milk sheep cheese from England. I figured that must be it, and bought a wedge of nearly a half-pound.

Fennel and Berkswell Cake at St John Bread and Wine in London

Fennel and Berkswell Cake at St John Bread and Wine in London

St. John Bread and Wine is Fergus Henderson’s smaller restaurant in the Spitalfields area of London (northeast). We visited last October when we also toured France and Spain. I asked the server how it was made, it seemed so simple. She consulted the kitchen and advised that, “it is sliced fennel, layered with Beekswell goat cheese and baked. To finish, the top was spread with a mixture of milk and cheese and broiled for 2 or 3 minutes to brown.”

They served the cake with pickled walnuts.  (After making my cake, I learned that Cheese Plus sells Pickled Walnuts in a can.)

Continue reading

Roasting Peppers

“3 red, or colored peppers, roasted, seeded and peeled”

That’s often all the recipe says about the peppers. Everyone has their own roasting method and I’ve tried them all. Recently, the Mariquita Mystery Box was chock full of colored peppers, and not only that, Carol wanted an extra bag of Red Piquillo Roasting Peppers to make her famous pimento cheese spread.

m_lode_o_peppers.jpg

a mother lode of peppers

Roasting peppers takes time. My go-to method is to hold a pepper over a gas flame until blackened, put it in a paper bag to ‘steam’ and then scrape off the skin with the back of a knife. Easy, effective, messy, takes time. Since I had 15 assorted peppers (Hungarian Spicy Peppers and other red and yellow) plus an equal number of the Piquillo to deal with, I thought I’d check out another method, so I went on line to Cook’s Illustrated and searched for roasted peppers. Here’s what CI had to say:

‘After flaming, broiling, and baking dozens of bell peppers of every color, both whole and sliced, we find that slicing and oven-broiling the peppers yields superior results.’

STEP BY STEP: Steps to Perfect Roasted Peppers
Pre-heat the broiler for at least 5 minutes.
1. Slice 1/4 inch from the top and bottom of the pepper.
2. Gently remove the stem from the top lobe.
3. Pull core out of the pepper.
4. Slit down one side of the pepper, then lay it flat, skin side down, in one long strip. Use a sharp knife to slide along the inside of the pepper removing all ribs and seeds.
m_cleaned.jpg
5. Arrange the strips of peppers on a baking sheet, skin-side up. Flatten the strips with the palm of your hand.
6. Adjust oven rack to its top position. If the rack is more than 3 1/2 inches from the heating element, set a jelly-roll pan, bottom up, on the rack under the baking sheet.

m_broiled.jpg

7. Roast until the skin of the peppers is charred and puffed up like a balloon but the flesh is still firm. You may steam the peppers at this point or not, as you wish. Start peeling where the skin has charred and bubbled the most. The skin will come off in large strips.

m_peeled_too.jpg

Sorry CI, that’s just WRONG.

The peppers turned out leathery and really really hard to peel, and why not, cut open, spending time in the broiler dries them out. I don’t know what equipment CI used, but I used a countertop convection oven, which is relatively new, reliable and holds its temperature very well.

C’mon CI: You’re usually reliable, but sometimes you over analyze. Continue reading

KETCHUP

k_bottle.jpgWhy on earth would a person want to make his own ketchup?My wife saw Jamie Oliver make ketchup on his TV show and told me about it. I had no intention of actually making ketchup, but I downloaded the recipe from the Food Network website, just in case.

[Yes, I know, I’ve just done two other posts involving Jamie Oliver. It’s just that he’s doing tomatoes right now and they’re in high season. Besides, his cooking is simple and good.]

Continue reading

Meat the Manchurian Mothership

Grilled Porterhouse Steak sliced over Mashed Manchurian Shell Beans with Jamie’s Mothership Tomato Sauce.Sounds like something that might be on a “menu changes daily” restaurant menu. Actually, it’s what I made for dinner Friday night.It all started at the Marin Sun Farms stand at the Farmers Market. I was in the mood for steak and looking for a New York strip steak when I came across this big gorgeous Porterhouse. It cost $24, but was easily big enough for two meals. Oh boy.porterhouse.pngphoto: Cooks ThesaurusSlow Food Nation was over and the week was warm and lovely in San Francisco. I was in a grilling frenzy — grilled chicken thighs over summer vegetables and grilled brats with cabbage in a sweet sour sauce led off the week. I got the Porterhouse out of the meat drawer and showered it with salt and pepper. Now what?Manchurian shell beans are similar to Cranberry beans. I had some in the fridge that were crying to be used. In the same vegetable drawer was a head of broccoli. Leftover tomato salad could be used to complete the meal; all I needed was a method.
Continue reading

Summer Grill

Corn, Peppers and BratsWith all of the pleasurable traveling I’ve been doing, there hasn’t been much time to write about cooking real food. It was great to get back to the Saturday Farmers Market.The summer Farmers Market brings lots of good things, corn and bell peppers among them. An onion, a grill and some good mixed brats, some butter and a skillet all came together to make a flavorful, quick, hearty and lip-smackin’ good dinner.grill_raw.jpg
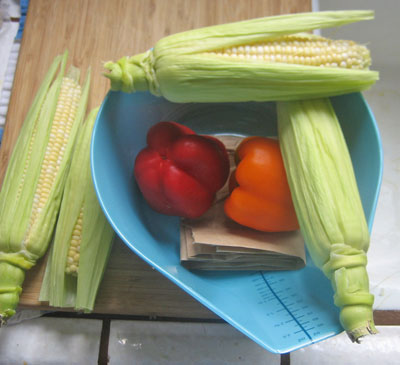
Here’s the corn and bell peppers ready to go. No prep needed, except cleaning up the corn.grill_cooking69.jpgThe hot grill is going — opened for the picture. Besides the corn and peppers I had half of a sweet onion and 1/3 of a red onion left from other things, as well as three Johnsonville Beef Brats and two Stadium Brats. In about 4 or 5 minutes, the Brats were browned; the vegetables went for about 8 minutes.grill_cooked71.jpgI could do the grilling about five o’clock when it was really nice outside and let the food wait until dinnertime. The peppers are sweating in the paper bag.grill_plated72.jpgWhen dinnertime came around, the corn and peppers were sautéed in butter and the Brats put in a 200 ° toaster oven to warm. Cherry tomatoes and a bottle of Cline California Zinfandel completed the picture. Yum.